
Have you seen all the big decorative letters that are so popular lately? I love them, and I have been coveting them for some time now. I have a stockpile hoard of cardboard boxes stashed next to my washing machine in the laundry room, so I thought I'd see what I could do! Read on for part one of my decorative letters tutorial!

Let's get started!
You will need:
Cardboard salvaged from shipping boxes
A ruler
A pencil
Scissors
A Craft Knife
Scrapbook paper
stamps
other embellishments of your choosing
Step One:
Decide what you want your letters to spell, or if you just want to make one letter, like your last name initial. I decided I wanted to spell "HOME", because I am trying to decorate my house in such a way that my family feels like it is truly a home. I thought I could use this project as inspiration for my goal!
Step Two:
Decide how big you want your letters to be. If you have a place that you know you want to put them, you can measure that spot and make adjustments accordingly. I wasn't sure where they were going, so I just made them all the same size, as big as I could using the cardboard I had. I only had to use the flaps, so there is still plenty of cardboard for my next project!

Step Three:
Cut the cardboard according to what you decided you are making. I cut off the flaps, and then cut them in half. Since the box I was working with was square, this gave me eight pieces of cardboard, all the same size, about 12"x9".

Step Four:
If you have stencils, use them to trace your letters. I don't have stencils that big, so I just free-handed the letters. This is easier than it sounds. The cardboard has ridges that are straight up and down. I used those to guide the up and down parts of the letters, and then just used my ruler to make the side to side parts. If you use a really simple block font it is really simple. Make sure the letters are the same width all the way around. In my case my letters are 2" wide.

Step Five:
Cut out your letters. I started cutting with my scissors. It was hard! Eventually I used my craft knife, much easier. Since the cardboard has those straight up and down ridges in it, I just followed them for the up and down cuts. Much easier than scissors. Also, a sawing motion seemed better than straight cuts.

Step Six:
Okay, we have our letters cut out. The only thing left to do is decorate them! I started by selecting scrapbook paper that I love to cover them with. Use the letters as a pattern and trace around them on the back side of the paper you want to use. That way you won't have pencil marks. Then cut out your letters in scrapbook paper and glue it down to your cardboard letters. See? They already look lovely, and if you are a minimalist you could stop here. Not me, when I have a chance to decorate something, I do it! I suppose you could paint your letters instead of papering them. That would be fine. I just have some scrapbook paper that I love and I used that.

Step Seven:
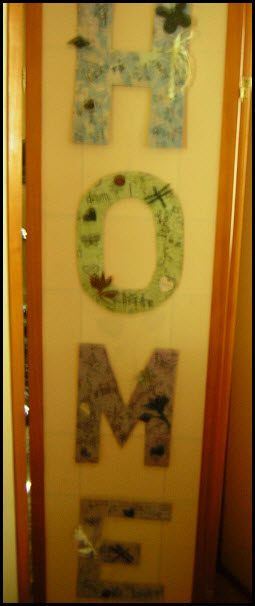
Now you get to go crazy! Use your stamps, embellishments, markers, whatever you want to make them gorgeous! I stamped them like crazy and added some home made embellishments of flowers and dragonflies. One cool thing is that you don't have to be a super artist to make shapes. Just roughly mark them out on the back side of the paper you want to use. Cut them out and see? They look good even if its just a rough shape! You could always print out some shapes and trace them, but that's too much work for me!


Step Eight:
Hang them up! I am going to do a part 2 of this project, my goal is to make these letters 3-D, so it will address that part. I just needed to call it quits for the day and decided this was a great place to stop, while the letters still look great until we get to part 2!

I just put them on the back of my room divider so I could take a photo, once I make them 3-D I want to place them on a shelf. Have fun making your letters, and if you have any questions drop me a line! What do you think? Pretty easy, huh, and I enjoyed making them so much! Are you going to make some too?
Happy Lettering!
Love and Hugs!
Jillie

Let's get started!
You will need:
Cardboard salvaged from shipping boxes
A ruler
A pencil
Scissors
A Craft Knife
Scrapbook paper
stamps
other embellishments of your choosing
Step One:
Decide what you want your letters to spell, or if you just want to make one letter, like your last name initial. I decided I wanted to spell "HOME", because I am trying to decorate my house in such a way that my family feels like it is truly a home. I thought I could use this project as inspiration for my goal!
Step Two:
Decide how big you want your letters to be. If you have a place that you know you want to put them, you can measure that spot and make adjustments accordingly. I wasn't sure where they were going, so I just made them all the same size, as big as I could using the cardboard I had. I only had to use the flaps, so there is still plenty of cardboard for my next project!

Step Three:
Cut the cardboard according to what you decided you are making. I cut off the flaps, and then cut them in half. Since the box I was working with was square, this gave me eight pieces of cardboard, all the same size, about 12"x9".

Step Four:
If you have stencils, use them to trace your letters. I don't have stencils that big, so I just free-handed the letters. This is easier than it sounds. The cardboard has ridges that are straight up and down. I used those to guide the up and down parts of the letters, and then just used my ruler to make the side to side parts. If you use a really simple block font it is really simple. Make sure the letters are the same width all the way around. In my case my letters are 2" wide.

Step Five:
Cut out your letters. I started cutting with my scissors. It was hard! Eventually I used my craft knife, much easier. Since the cardboard has those straight up and down ridges in it, I just followed them for the up and down cuts. Much easier than scissors. Also, a sawing motion seemed better than straight cuts.

Step Six:
Okay, we have our letters cut out. The only thing left to do is decorate them! I started by selecting scrapbook paper that I love to cover them with. Use the letters as a pattern and trace around them on the back side of the paper you want to use. That way you won't have pencil marks. Then cut out your letters in scrapbook paper and glue it down to your cardboard letters. See? They already look lovely, and if you are a minimalist you could stop here. Not me, when I have a chance to decorate something, I do it! I suppose you could paint your letters instead of papering them. That would be fine. I just have some scrapbook paper that I love and I used that.

Step Seven:
Now you get to go crazy! Use your stamps, embellishments, markers, whatever you want to make them gorgeous! I stamped them like crazy and added some home made embellishments of flowers and dragonflies. One cool thing is that you don't have to be a super artist to make shapes. Just roughly mark them out on the back side of the paper you want to use. Cut them out and see? They look good even if its just a rough shape! You could always print out some shapes and trace them, but that's too much work for me!


Step Eight:
Hang them up! I am going to do a part 2 of this project, my goal is to make these letters 3-D, so it will address that part. I just needed to call it quits for the day and decided this was a great place to stop, while the letters still look great until we get to part 2!
I just put them on the back of my room divider so I could take a photo, once I make them 3-D I want to place them on a shelf. Have fun making your letters, and if you have any questions drop me a line! What do you think? Pretty easy, huh, and I enjoyed making them so much! Are you going to make some too?
Happy Lettering!
Love and Hugs!
Jillie
wow thats amazing idea for decorate my child's room, i really like this decorative letters
ReplyDeleteThanks so much! I have been on vacation, but look for new posts this week!
ReplyDelete